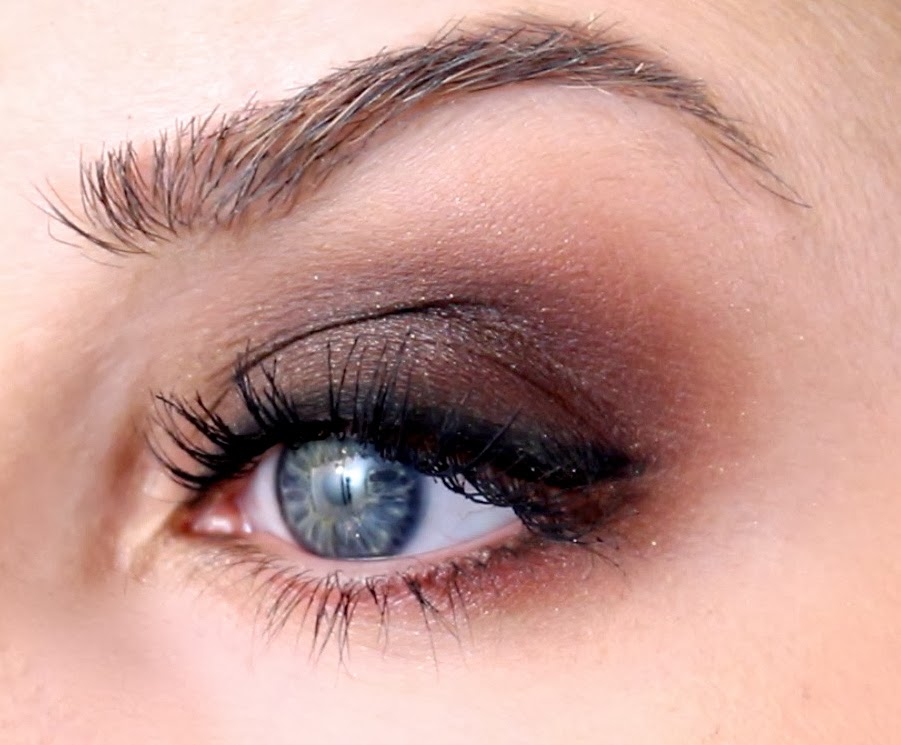
This trend is EVERYWHERE right now! Sometimes I cringe a bit when I hear a decade followed by the word "trend" where makeup is concerned. It can get a bit crazy. Because no decade can really be defined with one specific look, I like to combine my favorite makeup trends from the decade to create something really gorgeous and wearable. Of course, this one has lots of 90's makeup little tricks as well (think blush on your forehead and powdered lips).
This one is especially fun because the 90's aren't too terribly far in our past. Funny enough, lots of what defines a more "current" look of today is greatly inspired by this decade. I was surprised to discover that my go-to makeup style is very 90's! Hey, no shame. My earliest "real" experimenting with makeup took place in the 90's so it makes sense.
I really had a lot of fun with this one and I hope you guys will try it! Check out my full tutorial below for a complete step-by-step tutorial to get this look...
I'm on a bit of a foundation kick lately (you may have noticed...). SO many new ones to try!
I have a bit of a love/hate relationship with pressed powder foundations. I have oily skin, so if the formula is right, they can be a lifesaver for combatting shine and keeping my skin looking matte and fresh throughout the day. They're also super easy and convenient.
However, certain formulas can look a bit cakey, settle into lines, and dry out your skin like nobody's business.
Seriously, nobody has any business dealing with those types of problems when you're spending a lot on a makeup product.
So I decided to give this one a go after reading all of its seemingly miraculous claims of a "rose petal matte finish" (Who doesn't think that sounds good?), not settling into lines or drying out skin, medium-full buildable coverage, and probably my favorite part, the sweet cocoa powder scent.
I use shade "light", which is a pretty perfect match for me. When I first opened the packaging and smelled the chocolate (exactly like that of the Chocolate Bar palette or their cocoa powder-infused bronzers if you're familiar), I got a little woozy... Good woozy.
But I'm a skeptic where powder foundations are concerned so I gave it a good go for a few weeks and tested it in a variety of conditions (applying it lightly vs. heavily, applying it on super humid and hot days, touching up vs. not touching up all day, using certain concealers with it, primers, CC creams, you name it...) and think I've found the application method that works perfectly for me at this point.
As I've mentioned, I do have some skin issues going on right now (nothing major, but a bit more hormonal breaking out than usual due to my pregnancy), so I feel like it's the perfect time to really put some of these foundations to the test. We all know that anyone with perfect skin can pretty much make any foundation work for them, but sometimes it's best to really put the stuff to the test and see how it works with breakouts, discoloration, and even all of this southern heat and humidity we've been experiencing in my neck of the woods lately.
While I did a complete video review of this stuff (seriously, it's pretty thorough), and a demo showing you exactly how I've been using it lately in the way that works best for me (video at bottom of post), I'll go ahead and hit some of the high points and final thoughts...
First of all, it really lives up to all the claims it makes. It indeed does not settle into fine lines, look cakey, or dry out your skin, which is often my biggest complaint with pressed powder foundations. The finish IS beautiful. The whole "matte rose petal finish" description is pretty spot-on. I've also found that the coverage is above average for a powder foundation like this, and indeed can be built up (and built up quickly). To me, that is so important. While I like the actual results of the loose mineral foundations I've reviewed recently, I really get impatient working with the stuff for so long. All the building up of small amounts and blending and building and blending... It can suck up some serious time in your routine. This stuff is great because with the right brush (I detail all of my favorites in the video/demo), you can seriously pile the stuff on (not the best description for makeup application...), blend, and you're good to go.
For me right now, with all the discoloration I've got going on, I do have to add some concealer (and I even like to start with a CC cream as my primer step beforehand just to start off with a bit of coverage, however, when all that goes away and my skin is back to normal, this foundation will be even easier, because I don't think I'll need to add so much concealer to it. I find that it covers typical unevenness and discoloration pretty well on it's own.
Whew. So those are some of my main thoughts on this stuff. To seriously get every little detail (and of course, the demo/tutorial), check out my complete video below!
Let's face it, we all need a go-to makeup look. I'm finding that a variation of this look is definitely mine. I love my makeup to look sexy, flattering, a little smokey... You definitely can't go wrong with that combo, in my opinion! So today I decided to just turn the camera on and go for it. *Be prepared for a lot of details in this one... I left NOTHING out! Seriously, this is my complete current makeup routine, start to finish for when I want to go for something a little sexier. This particular variation involves a bit of bronze, peach, and plum. One of my favorite eye shadow combos. I hope you all love it!
False lashes are SO fun. Whether you go for a more intense, dramatic effect, or if you just like to reach for the natural-looking ones, the trick is getting the application right. You can apply the longest, most fluttery lashes and still get a look that doesn't scream "HEY everyone! I'm wearing false lashes!!"
"...you can totally tell because they're applied all wrong." We've all been there. No shame. So I wanted to share some tips so that you can have no fear of looking "fake" and wear your falsies proudly.
Funny enough, it's not just about how you apply the actual lashes. The way you do your actual eye makeup, brows, etc. can all actually be the most important factor. Seriously.
So check out my video tutorial below and wear your falsies like a pro!
::products used::
So what are your favorite falsies?? Any of your special tips to share with us??
Today I wanted to share with you all one of my favorite makeup looks to wear during the summertime... My favorite way to wear bronze.
Golden-bronze makeup just goes with Summer. This particular look is fun and glamorous, yet simple enough to wear anywhere, day or night. It's just one of those looks that always works.
I also wanted to share with you a laid-back outfit, perfect for Summer nights (or days). I love a good jumpsuit! They're so simple. I like to add bold accessories to give the look some edge...
*complete outfit details at bottom of post*
To see exactly how I created the makeup look, check out the complete video tutorial below!
So today I'm FINALLY sharing with you all a video I've been promising for a while now... A demo of how I use some of the Anastasia products I received from the brand months and months back to create my natural soft and defined brow look. I've purchased Anastasia products for years and years (some of the exact ones I use in the video), but I was so excited when they reached out to me to share some of their new (at the time) products, including the Dipbrow Pomade and Brow Powder Palette.
Because these products impressed me so much and they became a part of my daily brow routine, I wanted to share with you all my thoughts on them and show you how I can use each one to create the natural, yet defined brow look that I always go for.
So be sure to check out the video below to see all of these products in action and hopefully you can pick up a tip and trick or two. No matter the formula you prefer, there's definitely something for everyone! I hope you guys enjoy it!
Post contains affiliate links. Anastasia products provided by Anastasia without any agreements or obligations to feature or review. All opinions are my own and genuine as always.
In my (almost) six years of doing beauty videos and blogging, my most commented-on and asked-about features are my eye lashes. I totally get that mine are naturally pretty good, but they definitely don't look the way they do without the help of some great products. I know I'll get questions about this... So I'll go ahead and tell you that I do not use any lash growth serums of any kind. I wish I had a magic formula I loved that I could recommend for growing lashes, but I don't. So for those curious, that's that. This lash trickery is all about products and techniques.
Even if you don't have great lashes, you can definitely make them their best and beef them up a bit and make them their best with a few of my favorite products and trickeroos.
So while I think no look is complete without some mascara, this look goes beyond that. For those days when you want something a little extra (without using false lashes, which aren't my favorite).
I hope you all love the look and maybe pick up a life lash-changing trick or two!
For me, when the weather warms up, my foundation routine changes. I like a more simple routine consisting of fewer, more lightweight products. This current routine has been so perfect for me lately, that I just had to share!
In addition to the tutorial, to celebrate all this wonderful warm weather, I also wanted to share some of the Ambient Lighting Powder love with you all. So I decided to do a little giveaway with probably the best Ambient Lighting product ever... The Ambient Lighting Powder palette. When it made it's debut months and months ago, it quickly sold out (not surprising). Well, now it's back at Sephora and readily available! *Get all the details for the giveaway at the bottom of the post! I hope all of you get the chance to enter!!
So I went pretty in-depth for this tutorial... I didn't want to skip anything! I just think perfecting your skin is probably the most important step in your entire makeup routine. If you get your skin right, everything just works! I hope you enjoy it!
FACEBOOK 3. Comment on the YouTube video above (one comment per day) telling me your must-have warm weather skin product. *PLEASE NOTE YOU CANNOT ENTER BY COMMENTING ON THIS BLOG POST* 4. Make sure your YouTube account is set up to receive private/personal messages 5. Giveaway will be open for entries until April 30th, 2014 *(edit 4/23/14) GIVEAWAY WILL END ON April 25th, 2014.* 6. One winner will be chosen at random and I will contact you via YouTube private messages 7. GIVEAWAY IS OPEN INTERNATIONALLY! 8. GOOD LUCK!!
Apparently this week I've been majorly in the mood to do tutorials... because today I'm back with another! This one is unique in that it is a smokey eye that actually makes your eyes appear brighter and more awake.
While dark, smokey eyes are beautiful (and some of my favorites where makeup looks are concerned), they can be a bit enclosing. At times, they can also make your eyes actually appear smaller. So in this video, I'm going to show you how to avoid all that, while still keeping the beautiful dark and smokey intensity of the deep eye shadow colors and liners used.
Oh, and I busted out my IT Cosmetics Naturally Pretty Vol.1 Matte (that's a mouthful) palette again! If you missed the first tutorial using this palette earlier this week, check that out here and get all the details about the palette (swatches, etc.) in this recent post here. It's seriously SO versatile.
So don't miss the video below for the full tutorial! I hope you all love it!!
I'm SO in love with the IT Cosmetics Naturally Pretty palette. The colors, the quality... everything. I've been using it pretty much exclusively since I got it a few weeks back and I can honestly say the quality is unmatched to ANYTHING else I own. I know that's a pretty big statement, but seriously the shades seem to blend themselves. I'm also obsessed with the actual colors. There are so many possibilities with this one. I love how they included a nice mix of more natural shades as well as some purple, coral, and blue. All while keeping the shades incredibly pigmented, yet wearable. This isn't really going to be a huge post reviewing the palette itself (look for a swatch post here on Thursday), however I do give a little overview/review at the beginning of the video below before the tutorial.
For this look, I wanted to create a sort of "wear anywhere" Spring look. I kept with my favorite actual eye shadow placement that works for any look really, while using colors other than the typical browns.
Fluttery, natural lashes, clean liner, and a a pretty blend of brightening mauves and purples on the lid paired with baby pink lips and a glow of peach on the cheek all come together to create a really bright-eyed, put-together look that is also a bit fun for Spring. I hope you enjoy it!
So today I wanted to share a little tutorial I filmed over the weekend... My absolute favorite smokey eye. You know how you have some outfits (or in this case, makeup products), that just always work? Those that you never have to second guess or worry about?
Well, this is one of those makeup looks for me. Mostly because of my long-time love, NARS Cordura eye shadow duo. Seriously, it's so easy to apply and the colors blend together effortlessly. It's also super versatile. I love that this look can really be worn anywhere and look great with any type of look. From an elegant event, to a fun night out, to just running errands or shopping, you can seriously wear this simple smokey eye anywhere and look amazing! I hope you guys like it as much as I do!
I can't believe Valentine's Day is only one week away! I always love this time of year because Valentine's Day falls on the same week as our anniversary. Can't believe Brad and I have been married 6 years already! Time flies...
I find myself always leaning toward a specific type of look for date nights. I like to do something sexy, defined, and a bit flirty. I'm not into the idea of a significant other (especially on a date when you want to look extra nice) look at me and think, "Dang, that's a lot of makeup..."
I like to use more natural shades in a more defined way. Definitely a little more dramatic than the everyday look, with the added flair of some flirty and fluttery false lashes to make the look extra sexy.
So whether you're planning on a date night for Valentine's Day, or a fun night out with friends, try this look! It's one of my favorites!
Hair is a tricky business. A few weeks ago I had six inches cut off after I got super brave and decided it was time for a change. Don't get me wrong, it TOTALLY was. I was very much over the typical, curled, long and blonde moment (for now anyway). I was bored. It's so funny how hard it can be so hard to get used to styling a shorter length, even if it's not that dramatically different. Because I wanted to embrace the more fun, mid-length look and get used to styling it with a bit more volume, I felt like a conical iron was the way to go. Surprisingly, it wasn't that hard to get the hang of! I had never really had any experience with styling my hair with one before (other than a single failed attempt a few years ago). I was shocked at how fast and easy it can be!
Oh, and not to mention, the crazy volume!
So this is how I create my volumized wavy curls with my new conical iron. I hope you enjoy it!
Hope this helps some of you who may be in a bit of a "hair rut" with your regular curling iron, or those struggling to learn how to get back in a "styling groove" with a fresh cut. Hope you have a wonderful weekend!!
**COME MEET-UP WITH ME AT IMATS LA!! I'll be at the Sigma Beauty booth from 10:30am-12:30 pm on January 18th (Saturday's show). Be sure to stop by and say hi! I'd love to meet you!!
Well, I guess we survived the 2014 "Polar Vortex" around here. I still laugh a little inside every time I hear it called that considering we got ZERO snow that actually accumulated, but we had TONS of ice and frigid temperatures. It stayed in the low single digits for a few days... So 30's and 40's now (which we normally consider freezing cold in Georgia), now feels like a heat wave.
But seriously, I hope you all made it through ok. I realize that while tons of our neighbors and friends suffered busted pipes and property damage, I'm thankful that we made it out ok. All the stories of property damage, living with no heat and water, and all the other horrible things extreme and sudden cold weather can cause is always terrible to hear about.
But on a lighter note, I decided to do a look with a "Warm & Cozy" theme to help a little with these winter blues. So I filmed a more informal "get ready with me" type of tutorial and also shared my more realistic and cozy, winter-appropriate outfit that is still fun and fashionable. I hope you all love it!!
Oh and don't forget about IMATS this coming weekend!! I'll be there at the Sigma Beauty booth from 10:30am-12:30pm on January 18th (Saturday's show). Be sure to stop by and say hi! I'd love to meet you!!
O.M.G, you guys... Christmas is in 2 DAYS!! I can't even believe it! So before the holiday celebration gets officially underway around here, I wanted to share with you all one of my "go-to" party makeup looks, perfect for New Year's Eve! This would also be gorgeous for a Christmas Eve dinner celebration, or just any party in general, really. It's one of my favorite looks, and best of all, is super simple!
I also put together sort of an effortless and fun party look that works especially well in our neck of the woods, where it can get pretty cold on New Year's Eve. Not that wearing a slinky little dress that covers a quarter of my body can't be fun, but seriously, I like to dress season-appropriate for where I live. I've always been like that. So definitely don't feel like you have to go the typical sequined mini or tiny dress route for New Year's if it's freezing out. You can definitely dress party-appropriate, fashionable, and be season-appropriate. There's so many awesome options!
So check out my full video at the bottom of the post for a step-by-step tutorial on the makeup look as well as more info on the outfit. Hope you all love it!
This outfit reflects my personal style perfectly... I'd like to say my style is effortless (not like I tried too hard or too trendy), classic, and with a bit of an edge. Most of the elements are simple and chic (fitted blazer, silk top, leather tassel clutch), with one pretty trendy element.... the slouchy, tapered pant. Oh, and a few edgy elements: the necklace, and spikes on the back of otherwise classic pointed-toe shoes.
So let's talk about these pants...
I'm a little obsessed with them. They're slouchy, tapered, and in a gorgeous crepe-y fabric that looks and feels really nice. I also have them in black. They seriously go with whatever you put with them. They're just so easy. The nicer fabric gives them much more versatility than a typical cotton knit style.
The bright fabric (these are in the shade "carnelian") provides a little pop for the outfit. That's a big tip of mine where New Year's Eve is concerned. Don't get lost in a sea of black clothing. Black is such a popular pick for New Year's. Stand out with a pop of unexpected color. Whether it's with fun shoes, a bag, or in my case, fun pants.
Some large, chunky accessories, and these fabulous (and affordable shoes) complete the look.
So I figured since the first few days of December are upon us, it would only be appropriate to roll out the Holiday makeup tutorials. I have another planned for the month as well that is a bit different so keep an eye out for that too!
This one is very classic. Glamorous and glowing with a bit of sparkle, yet using natural tones. It's definitely my go-to look for holiday parties or when you just want to shine a bit while still looking elegant and put-together.


.jpeg)