The banisters go black...

Hello and Happy Tuesday, Everyone! I've got to say, I'm pretty excited to be turning 29 for the first time today. ;)

So today I'm sharing with you guys the finishing touch (for now) to our foyer.  I know, I know... this thing is turning into a saga.
Last we left it, this is how it looked...


Totally not bad. But after painting the French doors black, the stair banisters and railings up top looked a bit too tan-brown. You can see it a little more in this photo...


Totally wanting to change the stair carpeting eventually and have a prettier runner (maybe a printed neutral?) put in.  Definitely need carpeting of some sort on the stairs for Waylon (our 80-lb Golden Retriever) and I like a runner as well. I think it makes them look more finished and far less noisy.
Anyway, that will come later on. The carpeting on them now matches what is upstairs and is totally brand new, so we're not in a hurry.
K, back to the topic at hand...

Here's one more before shot.

Again, totally not bad, but notice the black frame, black chair (in first two photos), and black accessories. Also the big chandelier in there has an oil-rubbed bronze finish which almost looks black (as well as the little pendant lighting in the hallway you can see above). So the stair railing going black just made sense.

While I knew the railing was going a glossy black, the dark brown flooring and side planks of the stairs match, and I LOVE the look of those. So stair planks stay the color of the floor because that just makes sense... because they technically ARE the floor. At least that's what makes sense to me, and it turned out beautifully!


I used Onyx Black by Glidden in a high gloss. It's the perfect deep, glossy black. I did two coats with a small velvety pad paint applicator. You know, those that usually are used for deck stain? Well they sell tiny ones. It worked perfectly. No brush marks! On the underside of the railings around the spindles, I used a small brush to paint around each one. That was a pain. But the end result was worth it.

**edit: I forgot to mention that I DID lightly sand them before painting. They weren't too heavily lacquered before, but did have a bit of a sheen. 


I also painted the railing on the little "lookout" area above the family room.


Loving that as well.  Not loving how yellow the paint up there is pulling on camera...haha. If I could reach that myself, let's be honest, I would have already changed that. It's really a a more warm tan in person, but I'd love something a little more gray. I'd love to have it re-painted in the pretty Castle Path shade by Behr that we had all throughout our first house.  We've got plenty of time... ;)


I love how the wood grain is still really noticeable. Seeing the natural texture of the wood makes it look like they've always been black!

After living with the white in the foyer for weeks now, I'm absolutely LOVING it. Nothing like a crisp white foyer.  It really makes the house look open and inviting when you enter. With the black railings, it's such a classic combo, but looks a little modern too.

Much better from where we started!


Solid gold, baby.

Check out more posts about the foyer transformation here and here.

How I Packed for New York!

Hey everyone!
So some of you who follow me on Instagram probably know already that this past weekend I took a quick trip to New York City to shot something special for Shape Magazine. It was such an awesome experience!! Although I already posted a few photos from the trip on Instagram, here are some of those and a few more...


Some gorgeous shots of the city from the top of the Empire State Building...


The last day we visited Ground Zero and saw the new towers built near the World Trade Center site. The tower below is the same one lit in red, white, and blue above. 


We got the opportunity to speak with a few New York City Police Officers near the area who were SO nice and hospitable. We could have talked to them and asked them questions all day and they probably would have been glad to. All of the "true" New-Yorkers we met were some of the nicest people ever.

SO while I was packing last week, I thought it would be the perfect time to film a little packing "how-to" video. Or at least how I did it for this particular trip. So check out my (very long) video below to see  some of my best packing tips and all the things I brought along!


Gems of the Drugstore...

Hello and happy "hump day" everyone! I'm spending today gearing up for an upcoming trip to NYC! I'm so excited...
But beyond all the packing today (and a bit of filming), I wanted to share my latest video with you all... My Drugstore Gems.  All my favorite little lovelies the drugstore has to offer.  I hope you all enjoy it!

Don't forget to follow me on Instagram and Twitter for lots of updates and photos from the trip!


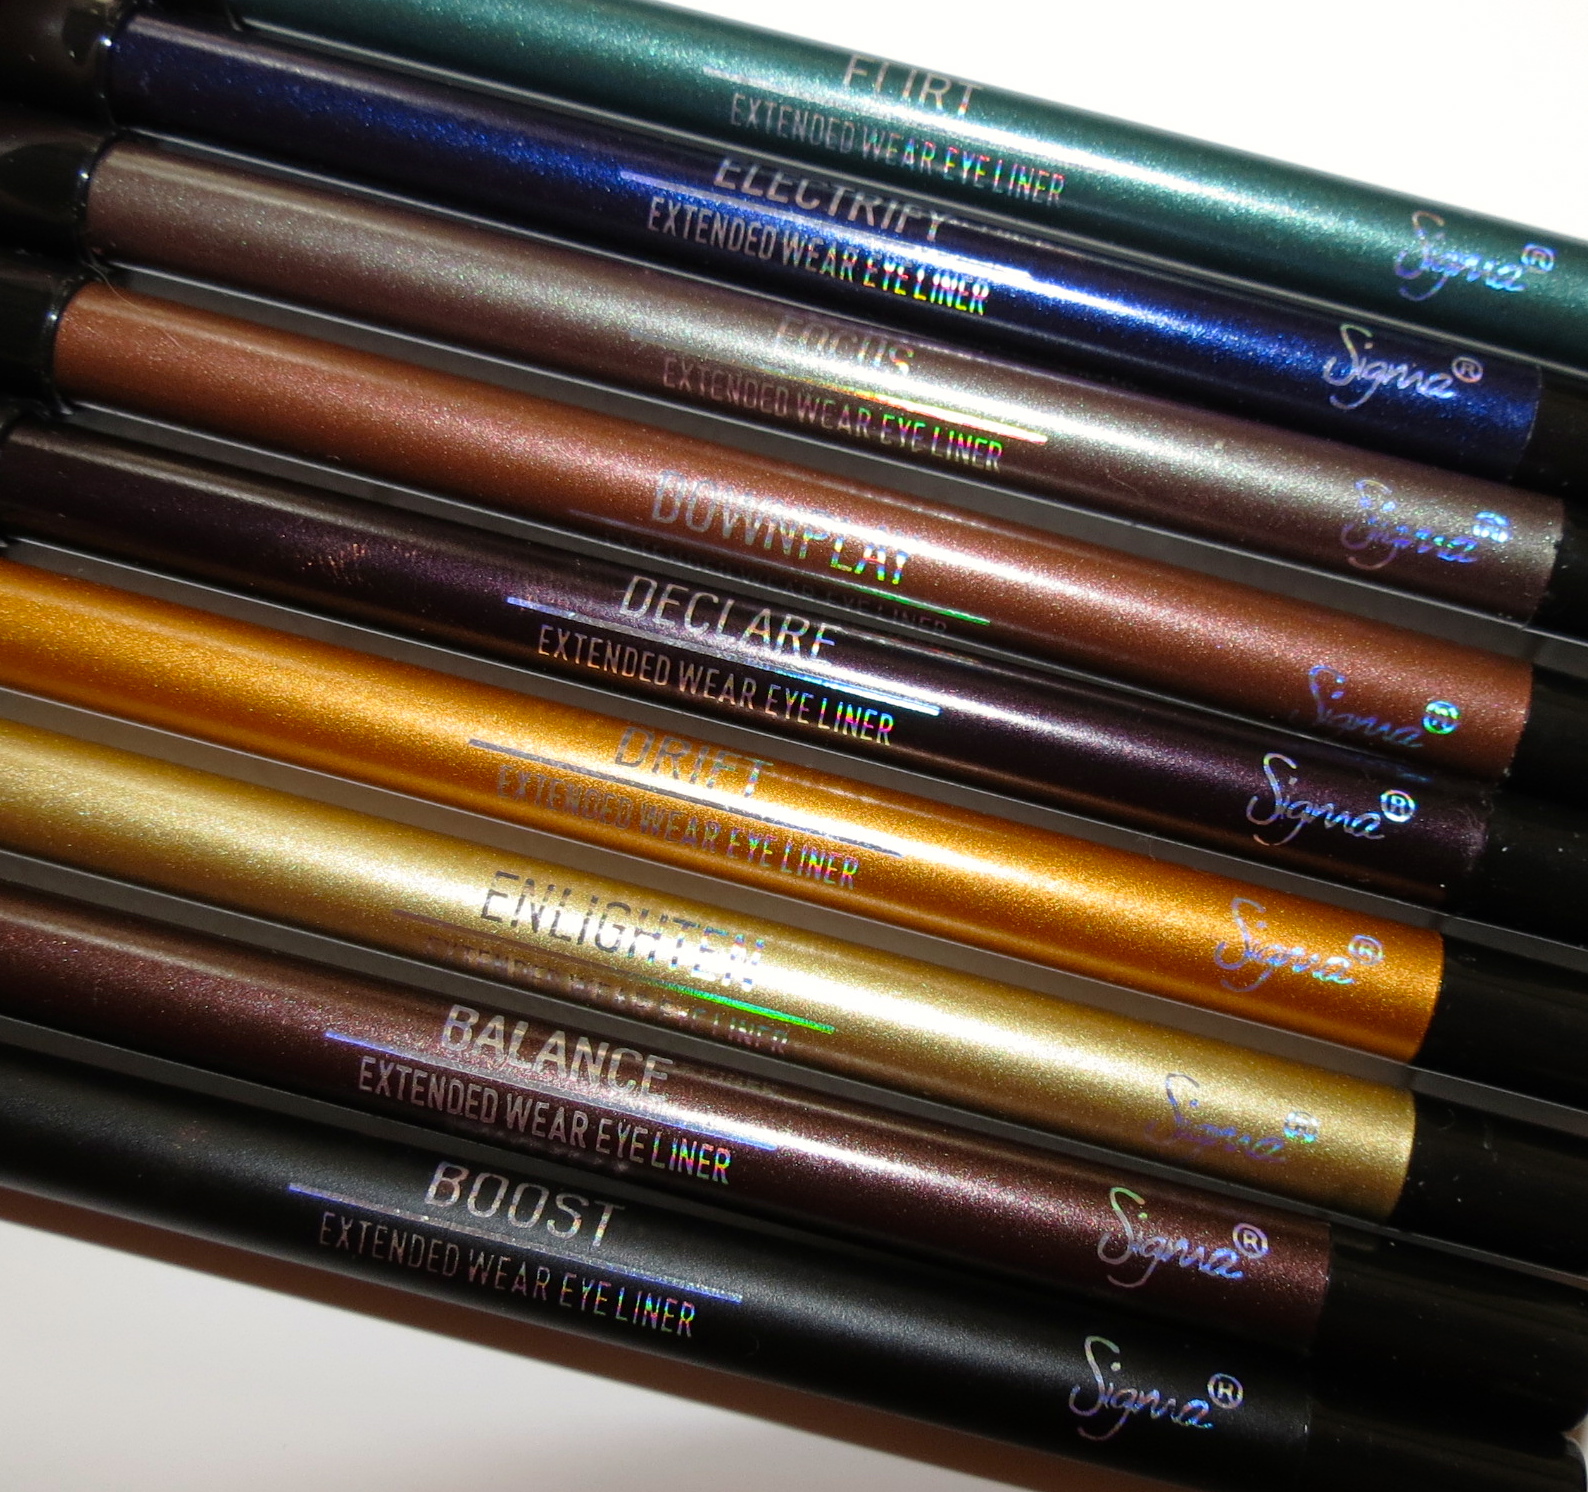
NEW Sigma Beauty Extended Wear Eye Liner Collection

Today I'm bringing you my thoughts on Sigma Beauty's new collection of 9 "Extended Wear" eye liners. 


They're available both individually and are also sold in color-coordinating "kits" of three (plus a brush).
I love the color-coordinating packaging. It really makes it easy to find the color you're looking for, rather than all-black packaging, searching for a name.


The individual eye liners are $9 each, while the eye liner kits (of 3 liners and a brush) are $33.
All but one of the eye liners are very shimmery. While overall, I'm not a fan of very frosted, shimmery eye liners (they can usually come off a bit softer and less pigmented than a matte formula), some of these I really love.  
Check out all my thoughts and swatches below....

top-bottom:
Enlighten, Balance, Boost
*These three shades are available individually or together in the "Neutral" kit, along with an E21 brush.


Enlighten is a "shimmery soft gold" and a great shade to use in the inner corner or along the lower lash line for highlighting.

Balance is a "shimmery chocolate brown" that is a bit softer in pigment than a typical brown eye liner. However, it's got a lot of soft (not chunky) shimmer that really transfers and gives it a bit of something different.

I really love Boost. It's described as a "matte rich black" I actually wore this shade a few days in a row and found it to be really easy to apply and just as long wearing as some of my other favorite pencil liners. This one is my favorite in the collection. Not just because it's black, but because the formula is awesome. I really wish there were a brown equivalent of it in the collection.


Downplay, Declare, Drift
*These three shades are available individually or together in the "Warm" kit, along with an E20 brush.


Downplay is a "shimmery antique rust" shade that would look gorgeous smudged along the lower lash line to really emphasize blue eyes.

Declare is a very soft "shimmery deep eggplant" shade. I wish it were a bit darker to wear as actual eye liner though. While I LOVE purple/eggplant liners, this one is a bit too soft for me to use as an actual liner.

Drift is a "shimmery vibrant yellow-gold" liner that would be perfect along the lower lash line or even as a base for a really bright gold eye look.


Focus, Electrify, Flirt
*These three shades are available individually or together in the "Cool" kit, along with an E30 brush.


Focus is a really pretty "duo-chrome green-brown" that actually reads (without flash) a bit gray. It definitely changes a bit in different light (as duo-chromes do), and is actually a good shade to wear around the entire eye for a softer look.

Electrify confuses the heck out of me. It's described as a "shimmery royal purple" which it is, however, the packaging and product itself looks very royal, almost navy blue.  I think that's what this collection is really missing.  A good deep blue. I do really like this shade though. It reminds me of Parfait Amour by MAC. Good bright purple bases are hard to find, so this would be great to use under a bright purple eye shadow or just as well as an eye liner. 

Flirt is a "shimmery vivid turquoise" that is definitely one of my favorites in this collection. The pigmentation is great and I love how the color reads far more green than blue. Good green liners can be hard to find.


So what are your thoughts? Any favorites you've got your eye on?

*If you guys decide to pick any of these up, don't forget to use the code "RNL2013" here to save 10%!


*post contains safe affiliate links

The patio that almost killed me...

When we moved into our new house months back, we were THRILLED to finally have some outdoor space. MAJOR outdoor space for us, especially compared to our last place where we had a very small (and sooo not private) backyard.
Part of what made me fall in love with our new house was the huge screened-in porch with more than enough room for a huge living area AND a big table. We also scored a huge backyard that is super private, perfect for entertaining. Outdoor space, check. However, we didn't have a great spot for things like our grill and gas fire pit.   While we had a really nice, level spot right off the screened-in porch stairs, we really wanted a paved area for those things. The other side of the porch slopes way down with more stairs from the backyard to a little area off the basement. Since the stairs from the actual house come down on this side, we thought it made more sense to have a little extension for outdoor living stuff on this side. We always thought that little area should have totally been paved already, so we took the plunge and did it ourselves.

Looking back, I think it's safe to say we definitely would not do this again if we had it to do all over. We LOVE the result, but the work was kind of back-breaking.

Let me just say before we begin... We are not experts at this and definitely did not do this perfectly. The result is pretty darn good (we think), so we're happy with it.
Here's the before...


Our original plan was to pave the entire area from the little cement slab from the porch stairs, all the way to the area where the wood stairs to the backyard begin (around the bottom-center of the photo).  We soon realized that wouldn't work because our irrigation system got in the way. About a foot in from that little corner, an underground sprinkler head pops up when that section is turned on. Not conducive to paving over. So we figured instead of removing it and going through all that trouble, we'd just stop the patio a little shy of it.
This area seems small, but it nearly killed us...
The first trick was picking up the pavers. We chose these from Lowes.


For our area, we calculated that we'd need 68.  Lowes helped us load them which was awesome. Unloading them was awful. Brad is really strong and could get a few at a time. I struggled with one, and I'm usually pretty strong.  These were HEAVY.

Check out all the pavers piled up... At this point, I was thinking, "What have we gotten ourselves in to??"  I think Waylon was thinking the same thing...

Next, we started digging. The main trick to this whole diy-paver patio thing is getting the area perfectly level.  So we each took a shovel and started to sort of "skim" off the grass.  It was SO hard for me to do, so Brad took over most of that job. I went around and scooped dirt and worked to further level areas that were obviously not.
Then, we worked together with our shovels to level it even further. I'll be totally honest here... We didn't "stake off" the area and use string to level it. We didn't use a level. We totally eyeballed this. However, we had a great advantage because the area was already pretty level and we had the nice wood retaining wall to sort of guide us.

Next, we put down 8 bags of "paver base". This stuff is basically really thick, moist sand. When you do this, wear gloves, people. Sometimes we didn't and I ended up with tiny cuts and splinters all over my hands and fingertips. I got really scared for a second there and thought I had totally ruined my hands. All my fingertips felt like I had at least 10 splinters in each. Not a good feeling.
Here's what that looked like during the spreading...


After you spread it (you can use it to further level your area), you can use a flat rake or even a big metal tamper to settle it all and make sure its flat and smooth.

Then you put down paver sand (not polymeric sand...yet) on top of that. Just a thin layer.

Thennnn you put down the pavers. You can put them down in any pattern you like.  This is the part that started really getting to me. One by one, we took turns grabbing the pavers and bringing them over. We'd each work on one, then go get another. It really made the process go quickly.  But the next day, my legs were feeling the burn...haha. All that squatting with the heavy pavers was serious business.

By this time, it was literally 11pm so we called it a day.

The next morning, we did the last (and most fun) step. Applying the polymeric sand. This step was so satisfying. Polymeric sand comes in buckets (we used two big buckets, not sure of the exact size, but you can get an idea from the bucket in the photo below) and basically keeps your pavers in place by turning to cement when you apply water to it. So we dumped it evenly to small areas at a time and spread it with a large push broom. The idea is to push it into the area in between the pavers and off of the paver tops themselves.  Brad did most of the sand dumping, and I did the spreading.
Until he really wanted in on the action and I gave up the broom...


We then took a leaf blower (per the polymeric sand's instructions) and lightly blew off the surface of the pavers to get all the sand off, while keeping as much in-between them as possible.  
Oh and I almost forgot to mention- on the edge of the pavers where they meet the grass (behind Brad in the photo above), we used some of the hammer-in black edging that you purchase especially for these. We didn't use it against the wood (because the wood kept it in place) or on the area to the right in the photo above against the pine straw area because that area goes up a little and we felt the area we dug out would be more than enough to keep it in place. Not that skipping that in those areas is what you should do, but that's what we did and it's working.

Finally, we gave the patio a light shower with the water hose to set the polymeric sand. We followed the sand's directions and stayed off of it for 24 hours. Then, when we stepped on it for the first time, we were pretty darn impressed with ourselves. 


For reference, where the flower pot is on the right side of the patio, is where I always stand for my outdoor OOTD posts. So YAY for no heels in the grass anymore! haha


That little wonky, muddy area to the right of the patio area in the photo above is another sprinkler pop-up area. Yeah we could have cut out the stone pavers in a way that would allow it to pop up through it, but we didn't. We're going to get that area grassy again and maybe add some large river rocks (too large for Waylon to scarf up)  in the same color of the patio to round it out a bit.

We also have some plans for the area to the left of the grill in the photo above. Eventually, we'd like to build (or maybe have it built) a stone grill enclosure there. That would free up some more space on the patio and look so much nicer.

Here's a closer shot...


Oh and the grand total we spent on this project was around $300. Not too bad. We had a sweet Lowe's coupon and the pavers rang up a LOT cheaper than they were advertised. So we're totally not sure what happened there. But we'll take it.

So my final thoughts. Don't do this... 
Unless you have a pretty level surface to start with. If you're dealing with a tricky area that is oddly-shaped, or really uneven, leave this to the professionals.  I would N-E-V-E-R do this again. Ever. haha, dramatic, I know. But seriously, we have been really enjoying it and we love the results, but I don't think I could make it through another one of these guys.  

Have you guys ever done this? Any huge diy projects you've been tackling lately?

Flawless & Natural "No Makeup" Makeup Tutorial

Having a good "no makeup" makeup look is essential. For everyone. I don't care how little or how much makeup you like to wear. If you've got a few great products and some tricks up your sleeve, you can look flawless all the time without looking like you're wearing a ton of makeup. Which is usually the idea, but sometimes it can be tricky to fake the look of no obvious makeup at all while still enhancing your features.
Check out my tutorial below for this essential makeup look that I hope you love!


Products Used:
Too Faced Primed & Poreless primer
Chanel Perfection Lumiere foundation
Maybelline Instant Age Rewind Undereye Eraser
Chanel Bronze Universal
Hourglass Ambient Lighting Powder in Luminous Light
MAC Studio Finish concealer
MAC Mineralize Skinfinish Natural
Tarte Amazonian Clay blush in Blissful
Nars eye shadow duo in All About Eve
Armani Smooth Silk Eye Pencil
Armani Eyes to Kill Mascara
Bite Beauty lipstick in Fig

*Save 10% on the Sigma products mentioned above using code RNL2013 (off your entire purchase) SITE-WIDE through July 31st! 

Easy Red, White, and Blue Nails

The 4th is almost here! We're having a cookout at our place tomorrow so today I'm running around getting all the food and everything we need. So while I may not feel like that's totally together, at least my nails are. :)
So this is my nail look for the 4th. Nothing super complicated. Just a result of me playing around with my favorite red, white, and blue nail polishes and glitters.


For a great tip on how to make white nail polish go on evenly and opaque, check out my blog post- "No Streaky Nails...EVERRRR" here.

 Colors Used:
Sally Hansen White On
L'Oreal Target Red
L'Oreal Jet Set to Paris
L'Oreal Sparklicious (glitter)
Illamasqua Untold (glitter)
Deborah Lippmann Across the Universe (glitter)
Out the Door Topcoat

Get PERFECT Nails! My Easy Manicure Routine and Must-Have Nail Care Products

I've never been the type to really enjoy getting my nails done. I used to get manicures here and there, but always was too impatient or felt a little grossed-out, even at the cleanest of places. I just like doing my nails myself. Over the years, I've discovered some awesome products to keep them looking their best. It's SO quick and easy and my nails have never looked better!

For all the details on how and when I use the products, check out my video below!


My Must-Have Nail Care Products:
OPI Nail Envy (original)
Essie Disappearing Trick (or any cuticle remover)
rounded, smooth metal cuticle pusher
stone nail file
4-sided nail buffer block (one that isn't too rough or harsh)
gentle, nourishing nail polish remover for natural nails
Soap & Glory Hand Food
CND Solar Oil
CND Sticky Base
INM Out the Door topcoat


A Little Trendy Chevron Dress...

So the past few days have been a bit cooler and rainy around here (and a bit gloomy at times). So I figured why not bust out a dress with a bit of a sleeve in a fun print...

Trouble with most of these little trendy, crazy-printed dresses of this style is that they're honestly a bit shapeless and can look a bit "too much" where the print is concerned if it's a bit louder like this one.

Which brings me to my main accessorizing philosophy-- Use accessories to toughen up "sweet" outfits. This dress would also work perfectly on a 4-year-old (ahem in a MUCH smaller size). But with the right accessories, it works for my personal style and looks a bit edgier and appropriate for a grown-up like myself...haha.
Don't get me wrong, it's super cute on it's own, but when the print is this loud, sometimes it's just screaming for something to break it up a bit.


Since these types of dresses usually fall a bit short on me,  belting them and losing a few inches is definitely not an option.  Then we'd be left with a whole new set of inappropriate problems, guys.
So to make it work, I like to throw on a jacket to break it up a bit. Especially when the print is super loud like this one.

Ahhhh much better.


SO much more "me". Leather jackets are genius. If you have a nice lightweight one like this, you can throw them on anytime, anywhere and they always work. Especially on cool, rainy Summer days.

So a bit of leather, a spiky necklace, and a chain-handled handbag did the trick. No longer 4-year-old appropriate.


details:
dress: Dress Up Boutique (shopdressup.com)
jacket: Tinley Road
purse: J. Crew Factory
necklace: BCBG
shoes: Forever 21

No Streaky Nails.... EVERRRRR!!!

I really hate it when I have a gorgeous shade of nail polish that looks gorgeous in the bottle... Only to have it look majorly streaky once applied. I think it's safe to say that nobody has got time for that.

A few of the top culprits... bright or light cream formula (no frost or shimmer) nail polish shades, and white. Even the best whites can look a bit streaky.  I discovered a mind-blowing solution.  Sounds a bit dramatic, I know, but the results are crazy good.

I love my nail polish to look super even and opaque, true-to-color, and majorly glossy.

Like this...


Hard to believe that this is only with two thin coats of the actual white. I used Sally Hansen X-Treme Wear in White On... One of THE BEST whites, but still a bit streaky unless you do like 3-4 coats, which then can be a bit thick and cause issues like peeling. Not to mention taking forever to dry.

Here's my secret...


 So do your base coat (if you're into those, I skipped it for this manicure), one coat of your nail polish, one thin coat of a matte topcoat, then one more thin coat of your nail polish followed by your top coat. The matte coat just helps the last coat of color go on evenly and opaque with no streaks. It doesn't effect the glossiness of the end result at all. They're just as shiny as always!

I'm LOVING this trick! I've tested this with other colors as well and it works every time!

Have you guys tried this trick? What do you think?